Photography Basics
The Beginner's Guide to Street Photography: Everything You Need to Know

Vasundhara Mukherjee
TL;DR
Street photography is about observation: Look for everyday moments, interactions, light, and details rather than waiting for dramatic scenes.
You don't need perfect technical skills: Good street photography is more about noticing and timing than getting every setting right.
Start close to home: Your neighbourhood, commute, local market, or familiar streets can give you plenty to photograph.
Take your time: Slow down, watch a scene, and let moments develop instead of chasing every person or opportunity.
Be respectful: Pay attention to people's body language, know when to ask permission, and be especially careful when photographing children or people in vulnerable situations.
Don't overlook editing: RAW files give you more control over exposure, colour, white balance, highlights, and shadows, so editing is part of finishing the photograph.
Practise with simple exercises: Try photographing one colour, following shadows, staying at one intersection, or documenting your daily commute.
Keep shooting: You don't need every outing to produce a great photograph. Consistent practice is what helps you start recognising photographs before you even raise the camera.
Street photography has a way of changing how you look at the world. At its heart, street photography is about paying attention to everyday life and recognising that even the most ordinary moments can carry emotion, humour, tension, or beauty. You don't need to travel to Tokyo, New York, or Paris to make compelling photographs. Every town, every neighbourhood, and every daily commute offers stories waiting to be noticed.
For many beginners, however, the biggest challenge isn't knowing where to go. It's getting past the doubts that appear before the camera even comes out of the bag.
This guide is designed to help you get past that first hurdle. I'll cover the gear you need in street photography, camera settings that work in real situations, what to look for when nothing seems interesting, how to photograph people respectfully, and how to edit your images without losing the authenticity that made you press the shutter in the first place.
What Is Street Photography?
Street photography documents everyday life as it unfolds. The scenes are unscripted. The people, if they're present, aren't posing for the camera. You're observing rather than directing, looking for moments that reveal something about the place, the people in it, or the small interactions that most of us overlook during our daily routines.
Despite the name, street photography isn't limited to streets. Markets, railway stations, cafés, beaches, festivals, parks, shopping centres, and quiet residential neighbourhoods can all become settings for street photography. The location matters less than the approach. You're responding to life as it happens rather than arranging it yourself.
That unpredictability is one of the reasons the genre remains so rewarding. You rarely know what the next corner will bring. Some days you'll walk for an hour without making a single photograph. Other days, everything seems to happen within the space of five minutes. Learning to embrace that uncertainty is part of becoming a street photographer.
It's About Stories, Not Perfect Pictures
Beginners often assume that great street photography depends on perfect timing or flawless composition. I was once one of these believers myself.
And although those things certainly help, they're rarely what people remember.
Think about the photographs that stay with you long after you've seen them. Chances are, they aren't memorable because the horizon was perfectly level or because every highlight was preserved. They're memorable because they captured something recognisably human. A fleeting expression. An unexpected interaction. A moment of humour or loneliness that felt honest.
Technical skill gives you more control over how you tell those stories, but it isn't the story itself.
It's easy to become so focused on camera settings that you forget to ask a much simpler question: What made you stop and notice this scene in the first place?
The answer to that question is often the beginning of a stronger photograph.
Why Street Photography Is One of the Fastest Ways to Improve Your Photography Skill
Every genre of photography teaches you something different. Landscape photography teaches patience. Portrait photography teaches communication. Wildlife photography teaches anticipation.
Street photography asks you to practise a little of everything.
You'll learn to recognise good light more quickly because it changes from one block to the next. You'll become more aware of how people move through a scene, which makes timing easier to anticipate. Over time, you'll also find yourself composing photographs almost instinctively, simply because you've repeated the process hundreds of times.
For street photography in particular, the biggest lesson, is observation. It encourages you to slow down and notice details that most people ignore. The longer you spend looking, the more photographs begin to reveal themselves.
That habit extends well beyond street photography. Whether you eventually photograph weddings, travel, wildlife, or landscapes, becoming a better observer will improve every photograph you make.
Why Street Photography Feels Difficult at First
A lot of beginners assume they're struggling because they don't know enough about street photography. More often than not, that's not the problem.
Street photography feels difficult because it asks you to do something that most of us have spent years trying not to do: draw attention to ourselves.
1. "I'm Too Shy to Photograph Strangers"
This is probably the most common concern beginners have, and it's completely understandable. Nobody enjoys the idea of making someone uncomfortable or being questioned about why they're taking photographs.
What surprises most new photographers is how rarely those situations actually happen.
People notice cameras far less than we imagine. In busy public spaces, you're simply one more person moving through the crowd. Most passers-by continue walking without giving you a second glance.
Over time, you also develop a better sense of which situations feel appropriate to photograph and which are best left alone. That judgement becomes just as valuable as learning exposure or composition.
2. "Nothing Interesting Happens Where I Live"
Every street photographer has believed this at some point, including myself.
Usually, it's because we're looking for spectacle instead of routine.
Interesting photographs are often found in repetition: commuters taking the same shortcut every morning, neighbours chatting across a fence, someone reading alone while the world rushes past behind them.
How to Photograph People Without Feeling Awkward
I’m pretty sure all of have worried about this at some point or even continue to do so.
It's easy to imagine the worst-case scenario before you've even left the house. In reality, most street photography happens without anyone paying much attention. People are busy getting somewhere, having conversations, checking directions, or thinking about their own day.
That doesn't mean you should ignore how your presence affects others. Good street photographers know the difference between observing and intruding. The goal isn't to photograph people without them knowing. It's to photograph everyday life without becoming the centre of it.
Here are a few habits that make that much easier and helps you overcome the hesitation around street photography.
1. Blend Into the Environment
The easiest way to avoid drawing attention to yourself is to stop acting like you're doing something unusual.
If you hesitate, repeatedly raise and lower your camera, or look around nervously after taking a photograph, people are far more likely to notice you.
Instead, move naturally.
Walk at the same pace as everyone else. If something catches your eye, take the photograph and keep walking. Don't linger unless you have a reason to.
2. Slow Down
Street photography rewards people who slow their pace.
Spend a few minutes standing at a busy crossing. Watch how people move through the space. Notice where the light falls. Pay attention to who stops, who hesitates and who disappears into the crowd.
The longer you stay in one place, the less you feel like someone hunting for photographs and the more you become part of the scene itself.
3. Let the Scene Come Together
There's a temptation, especially when you're new, to chase every interesting person you see.
Instead, try finding an interesting background first. It might be a patch of beautiful light, a colourful wall, an interesting shadow, or a row of repeating windows. Once you've found it, wait.
Eventually, someone will walk into your frame. This approach changes the way you think. Instead of reacting to random moments, you're anticipating them.
More importantly, it removes the pressure to point your camera directly at strangers. You're photographing a scene, and people naturally become part of it.
4. A Smile Goes a Long Way
Every now and then, someone will notice your camera. If they make eye contact, don't immediately look away as though you've done something wrong.
A simple smile acknowledges the moment without making it uncomfortable. More often than not, people smile back and continue with their day.
Occasionally, someone might ask what you're photographing. Just be honest. You’d notice how most conversations are surprisingly ordinary.
5. Know When to Ask
There isn't a single rule that works in every situation.
If someone is simply passing through a public space as part of a wider scene, photographers often capture those moments candidly.
But if you're making one person the clear subject of your photograph, particularly if you're close enough for them to recognise themselves immediately, it's worth thinking about whether asking permission makes more sense.
Sometimes asking changes the photograph, other times it creates an opportunity to make a completely different portrait.
I can’t point to which approach is automatically better. But I can say that good judgement comes with experience.
6. Pay Attention to Body Language
Street photography is also about reading people, as much as it is about finding the right light.
If someone looks uncomfortable, steps away, covers their face, or gestures that they don't want to be photographed, respect that immediately.
A good photograph is never worth making someone feel uneasy.
What Are Street Photography Ethics?
Street photography often sits somewhere between documentation and art, which means questions about ethics come up sooner or later.
What's legal isn't always the same as what's respectful. The best photographers understand both.
1. Public Doesn't Always Mean Fair Game
In many countries, it's legal to photograph people in public spaces. That legal right, however, doesn't automatically answer the ethical question.
Before taking a photograph, ask yourself a simple question: Would I feel comfortable if someone photographed me in the same situation?
Street photography works best when it's driven by curiosity rather than entitlement.
2. Photograph With Respect
Respect is about thinking carefully about how they're represented.
Ask yourself:
Does this photograph tell a story?
Is it relying on embarrassment or vulnerability?
Would I still think it was a good photograph if the subject were someone I cared about?
If the image depends on mocking or exploiting someone, it's probably worth putting the camera down.
3. Be Extra Careful Around Children
Photographing children requires a higher standard of judgement. Even where it's legal, parents or guardians may understandably feel uncomfortable if a stranger is photographing their child. If children are central to the photograph rather than simply part of a wider public scene, it's usually better to seek permission.
When in doubt, choose another photograph. There will always be another opportunity.
4. Think Carefully About Vulnerable Situations
Homelessness, illness, grief and public distress have all been documented through street photography. That doesn't mean every difficult moment should be photographed. Images of vulnerable people can raise awareness and tell important stories, but they can also reduce people to symbols rather than individuals.
Before pressing the shutter, consider why you're making the photograph. Is it helping someone understand the situation more deeply? Or is it simply dramatic?
5. Learn the Laws Where You Live
Photography laws vary from country to country.
Some places place restrictions on commercial use. Others have specific rules about photographing government buildings, transport systems or public events. Before photographing in a new city or travelling abroad, spend a few minutes familiarising yourself with local regulations.
Understanding the law gives you confidence. But I’d go further and say that understanding ethics earns trust.
Common Beginner Mistakes For Street Photography
Mistakes in street photography aren't technical. They're habits. But the good news is that habits can be changed once you recognise them.
1. Standing in One Spot Waiting for Magic
Waiting for the perfect frame as part of your street photography session requires a lot of patience but that might not be rewarding all the time. And while patience is important. So is movement.
If you've been standing in the same place for twenty minutes and nothing has changed, it's probably time to keep walking.
Some locations reward waiting. Others simply don't. Learning the difference comes with experience and you’ll figure this out the more you venture out in your street photography photowalks.
2. Taking Hundreds of Nearly Identical Photos
Digital cameras make it easy to hold the shutter down. But editing those photographs later is much less enjoyable. Instead of photographing every possible variation of the same scene, slow yourself down.
Take the photograph when something really changes. You wouldn’t tire yourself out with those editing sessions later.
3. Using Zoom Instead of Your Feet
A zoom lens isn't a substitute for observation. Walking a few steps closer often changes the relationship between your subject and the background in ways that zooming never can.
The best viewpoint is rarely the first one you arrive at.
Move around. Look from different angles. You'll usually find something stronger.
4. Looking Only for Dramatic Moments
Some of the most memorable street photographs capture moments that felt completely ordinary at the time. Train yourself to notice quiet moments as well as dramatic ones. You'll come home with far more interesting work.
5. Ignoring the Light
A fascinating subject photographed in poor light often feels flat. An ordinary subject photographed in beautiful light can become extraordinary.
Before looking for people, spend a few minutes looking at how light is moving through the street. It's one of the simplest ways to improve your photographs immediately.
6. Skipping the Editing Process
The photograph isn't finished when you press the shutter. RAW files, in particular, are designed to be developed.
Learning how to adjust exposure, colour and contrast is every bit as important as learning how to compose a frame. Editing is about finishing the photograph you saw when you took it.
How to Edit Street Photography
As a beginner, don't assume that editing is where photographs become artificial.
In reality, good editing usually does the opposite. It helps the final image feel closer to what you saw when you pressed the shutter.
Our eyes constantly adjust to changes in light, colour and contrast. Cameras record information objectively. Editing is the process of bridging the gap between the two.
The goal isn't to create a different photograph. It's to faithfully interpret the one you captured.
Why Your RAW Photos Look Flat (And Why That's a Good Thing)
If you've recently switched from JPEG to RAW, you've probably experienced a small moment of panic.
The image lacks the punch you remember seeing on the back of your camera. But there’s nothing to panic.
When your camera creates a JPEG, it quietly makes dozens of decisions for you. It boosts contrast, increases saturation, sharpens edges and applies its own colour profile before saving the image.
A RAW file skips that entire process. Instead, it preserves as much information as possible and lets you decide what the final photograph should look like.
That flexibility is the biggest advantage of shooting RAW. Highlights that appeared blown out can often be recovered. Shadows can reveal detail that seemed lost. White balance can be adjusted without degrading image quality.
The image isn't unfinished because it's worse. It's unfinished because the creative decisions are now yours.
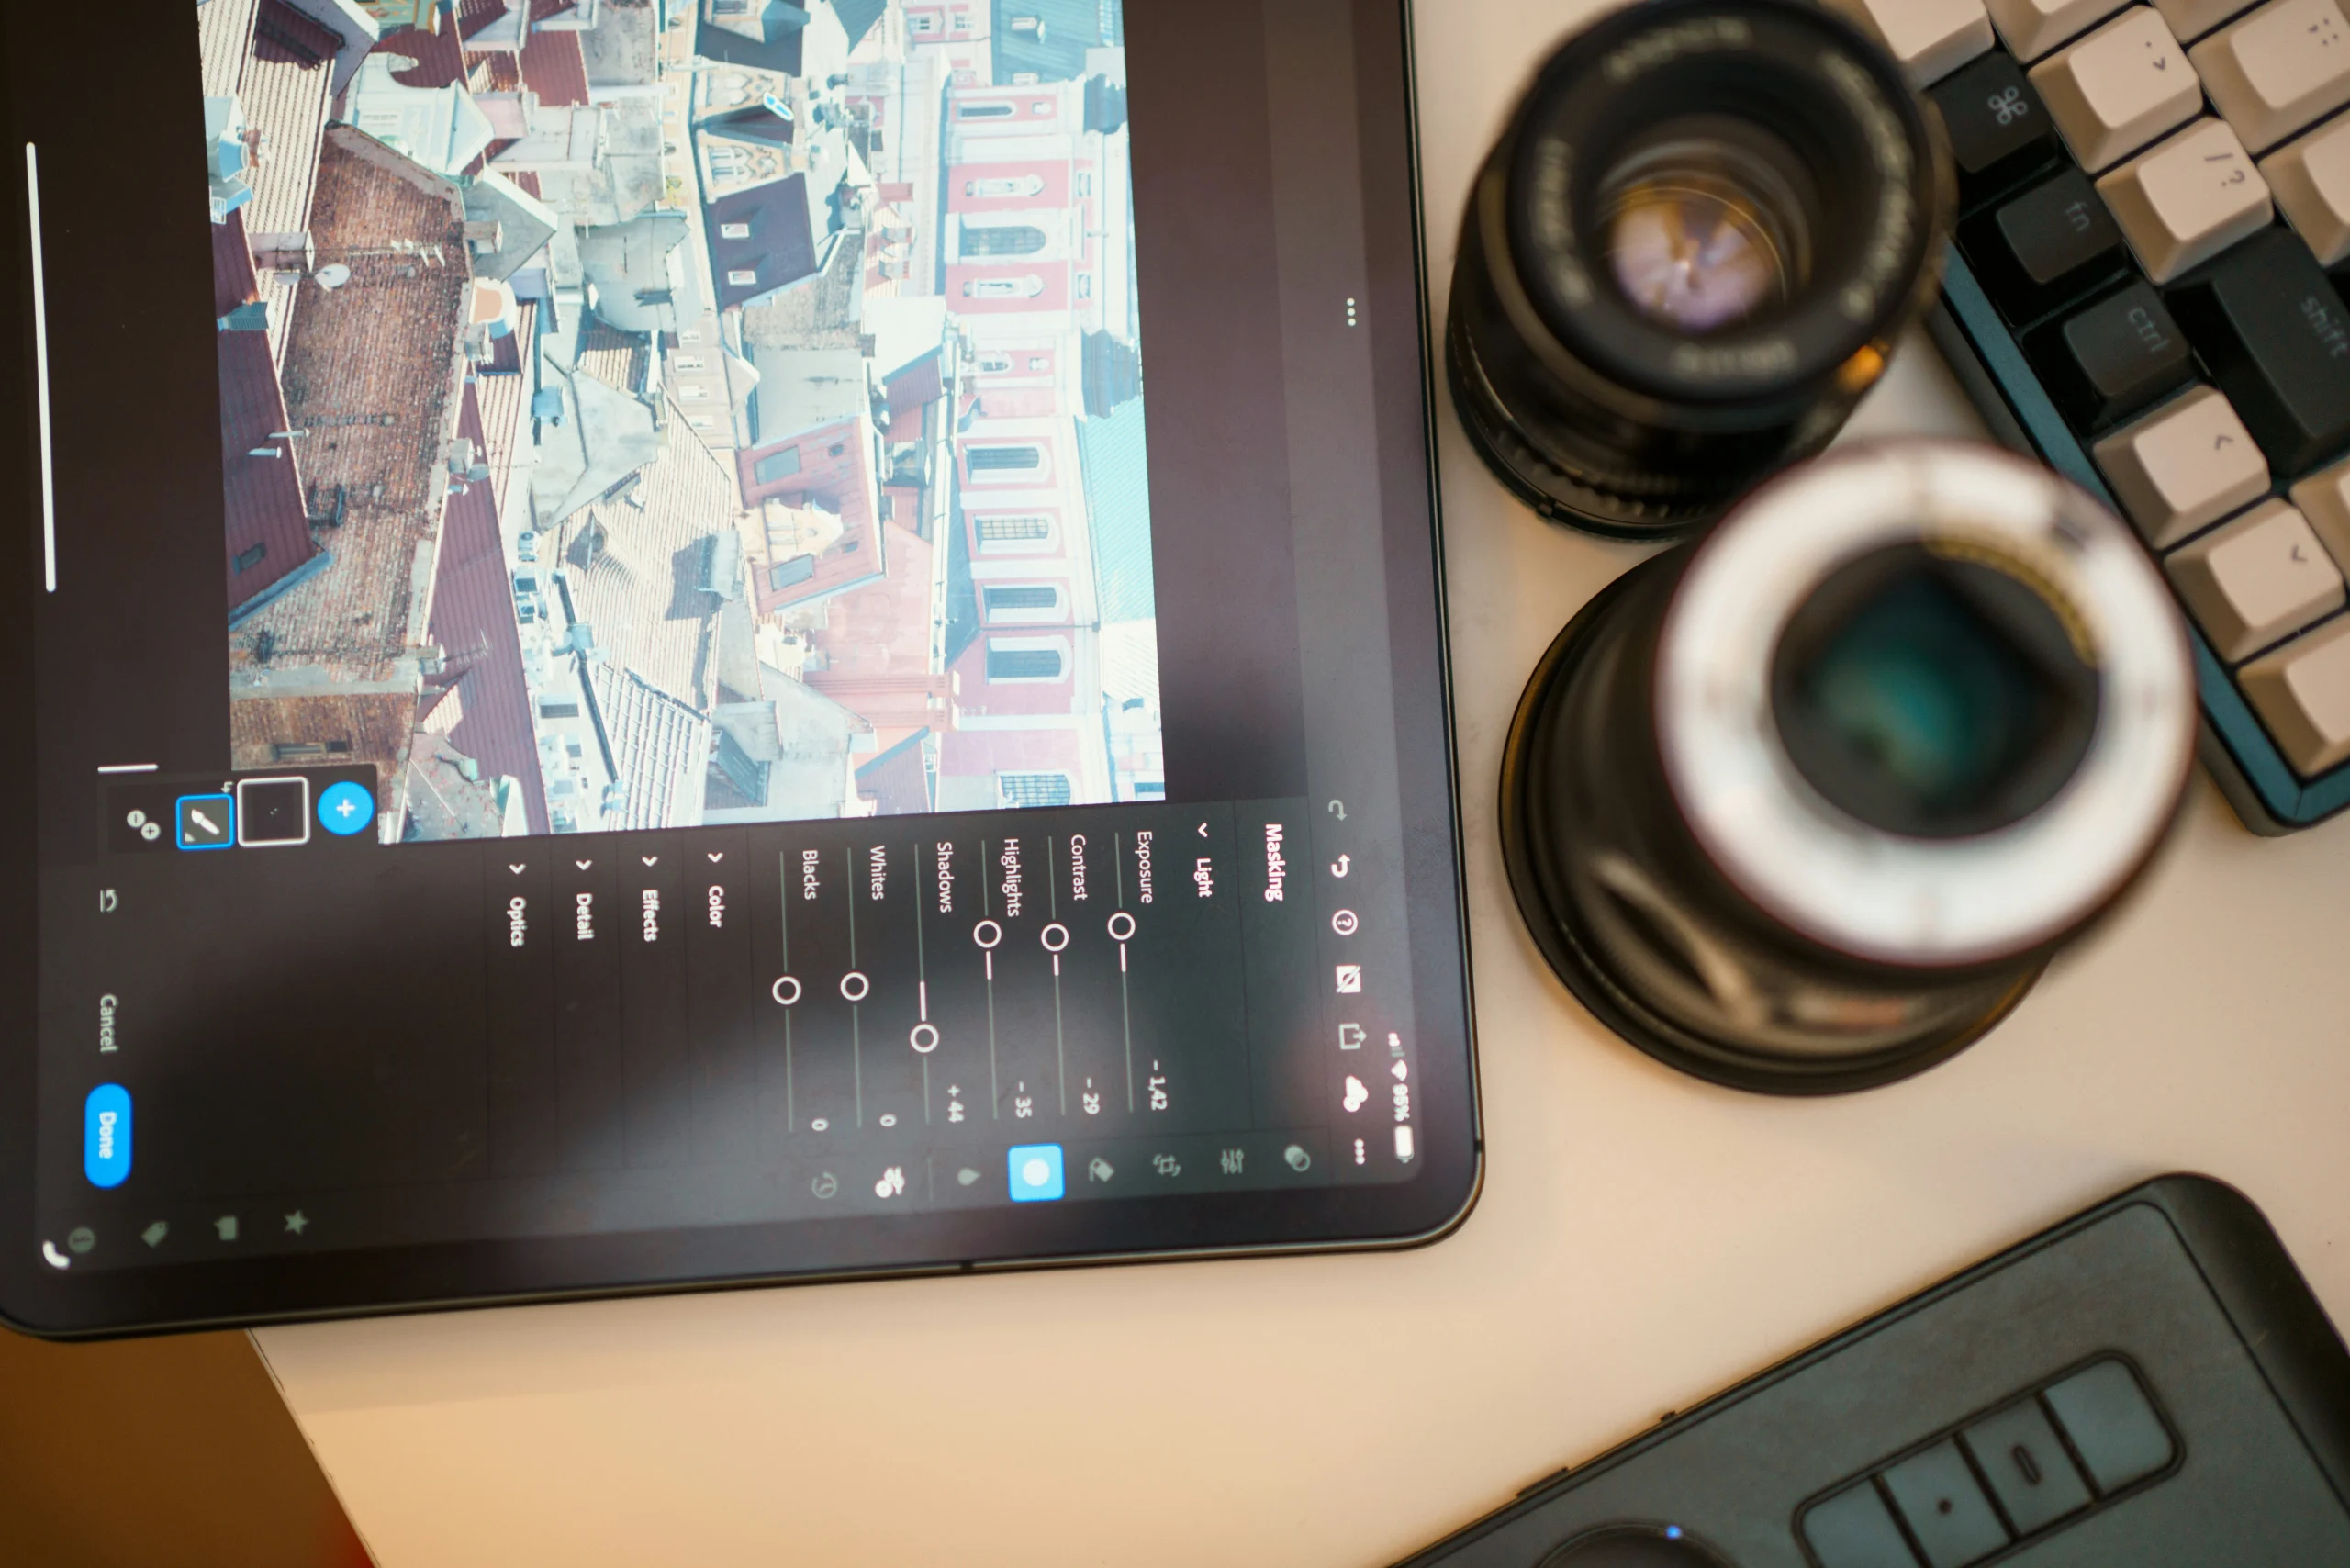
Start with Exposure
Resist the temptation to reach straight for dramatic presets. Instead, begin with the photograph itself.
Ask one simple question: Does this look the way I remember the scene? If the answer is no, exposure is usually the first place to start.
1. Exposure
Use the exposure slider to establish the overall brightness of the image.
Be cautious about pushing it too far in either direction. Brightening a photograph aggressively can wash out highlights, while darkening it too much often hides details that help tell the story.
A subtle adjustment is usually enough.
2. Highlights
Bright skies, reflective shop windows and white clothing can easily lose detail. Reducing highlights can often bring those areas back without affecting the rest of the photograph.
You don't need to recover every highlight. The goal is balance, not perfection.
3. Shadows
Street photography often involves difficult lighting.
A person standing beneath an awning while sunlight floods the street behind them can create strong contrast.
Lifting the shadows slightly can reveal important details without making the image look unnatural.
As with exposure, restraint usually produces the most believable results.
Get the Colours Right
Colour influences mood more than almost any other adjustment. A photograph that's slightly too warm can feel nostalgic. One that's too cool might feel distant or clinical.
Rather than asking what looks dramatic, ask what feels truthful to the scene.
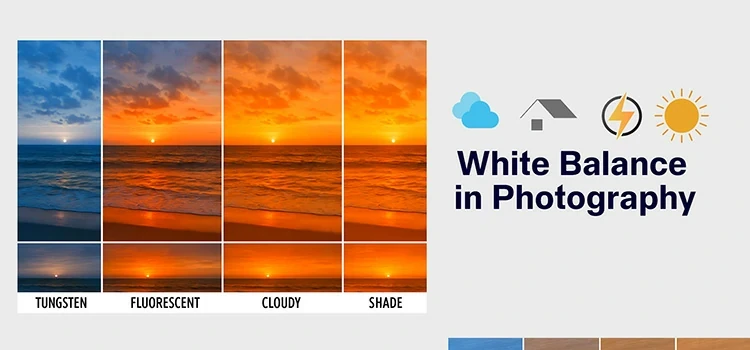
1. White Balance
If skin tones look unnatural or the light feels noticeably warmer or cooler than you remember, adjust the white balance before changing anything else.
Even a small correction can transform the image.
2. Vibrance vs Saturation
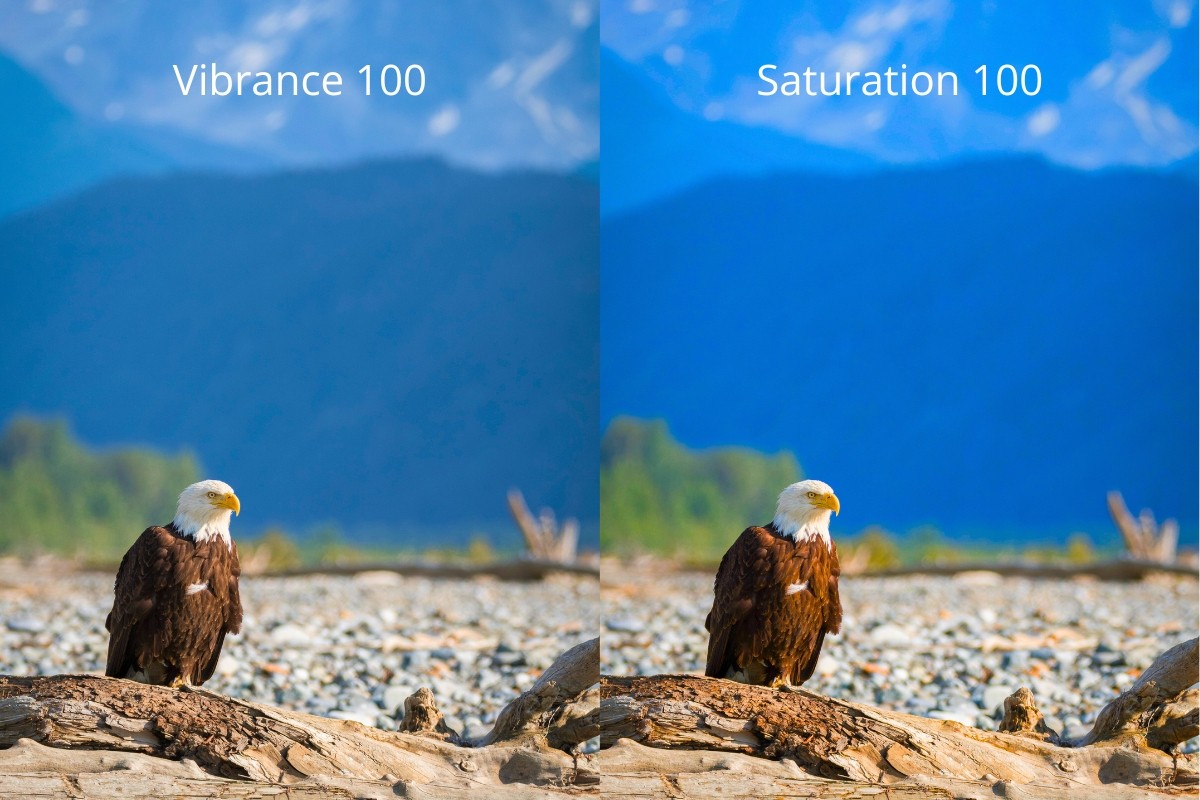
These two sliders appear similar, but they behave differently. Saturation increases the intensity of every colour in the frame. Vibrance is more selective. It boosts muted colours while protecting skin tones and colours that are already strong.
For street photography, vibrance often produces more natural results.
If you're unsure which one to use, start there.
Add Depth Without Overprocessing
This is an easy mistake to make, especially when trying to make every photograph look dramatic.
You end up applying heavy clarity, extreme contrast, over-sharpened details. And then the result often feels more like an illustration than a photograph.
Street photography usually benefits from a lighter touch.
1. Contrast
Increasing contrast can add definition and help separate your subject from the surroundings. Too much contrast, however, often crushes shadows and removes the subtle tonal transitions that make an image feel natural.
Adjust it until the photograph feels alive, not aggressive.
2. Texture and Clarity
Both sliders increase detail, but they do it differently. Texture enhances fine details such as clothing, brickwork or weathered surfaces. Clarity increases mid-tone contrast, giving photographs a crisper, more defined appearance.
They're useful tools, particularly in black-and-white street photography, but they're easy to overuse.
If the first thing you notice is the editing rather than the photograph, you've probably gone a little too far.
3. Dehaze
Despite the name, Dehaze isn't only for fog. A small adjustment can increase local contrast and improve separation between different parts of the frame.
Like clarity, it's most effective when used sparingly.
Crop to Strengthen the Story
Cropping shouldn't be a rescue mission. It should be a refinement.
Before reaching for the crop tool, spend a moment asking why you want to crop the image. Cropping is great to remove distractions and helps simplify. They remove unnecessary elements, tighten the viewer's attention and strengthen the relationship between the subject and its surroundings.
They don't completely reinvent the photograph.
Know When to Stop Editing
Every editing session reaches a point where more adjustments stop improving the photograph. The difficulty is recognising when you've reached it.
A useful habit is to step away for a few minutes before exporting. Come back with fresh eyes. If the colours suddenly feel too intense or the contrast looks harsher than you remembered, that's often a sign you've been editing for too long.
The best street photographs simply feel believable.
Learn From Every Edit
Editing isn't only about improving one photograph. It's also one of the fastest ways to improve your photography. Every adjustment tells you something about the image you captured.
Paying attention to patterns gradually changes the way you photograph. You begin making better decisions before you even press the shutter.
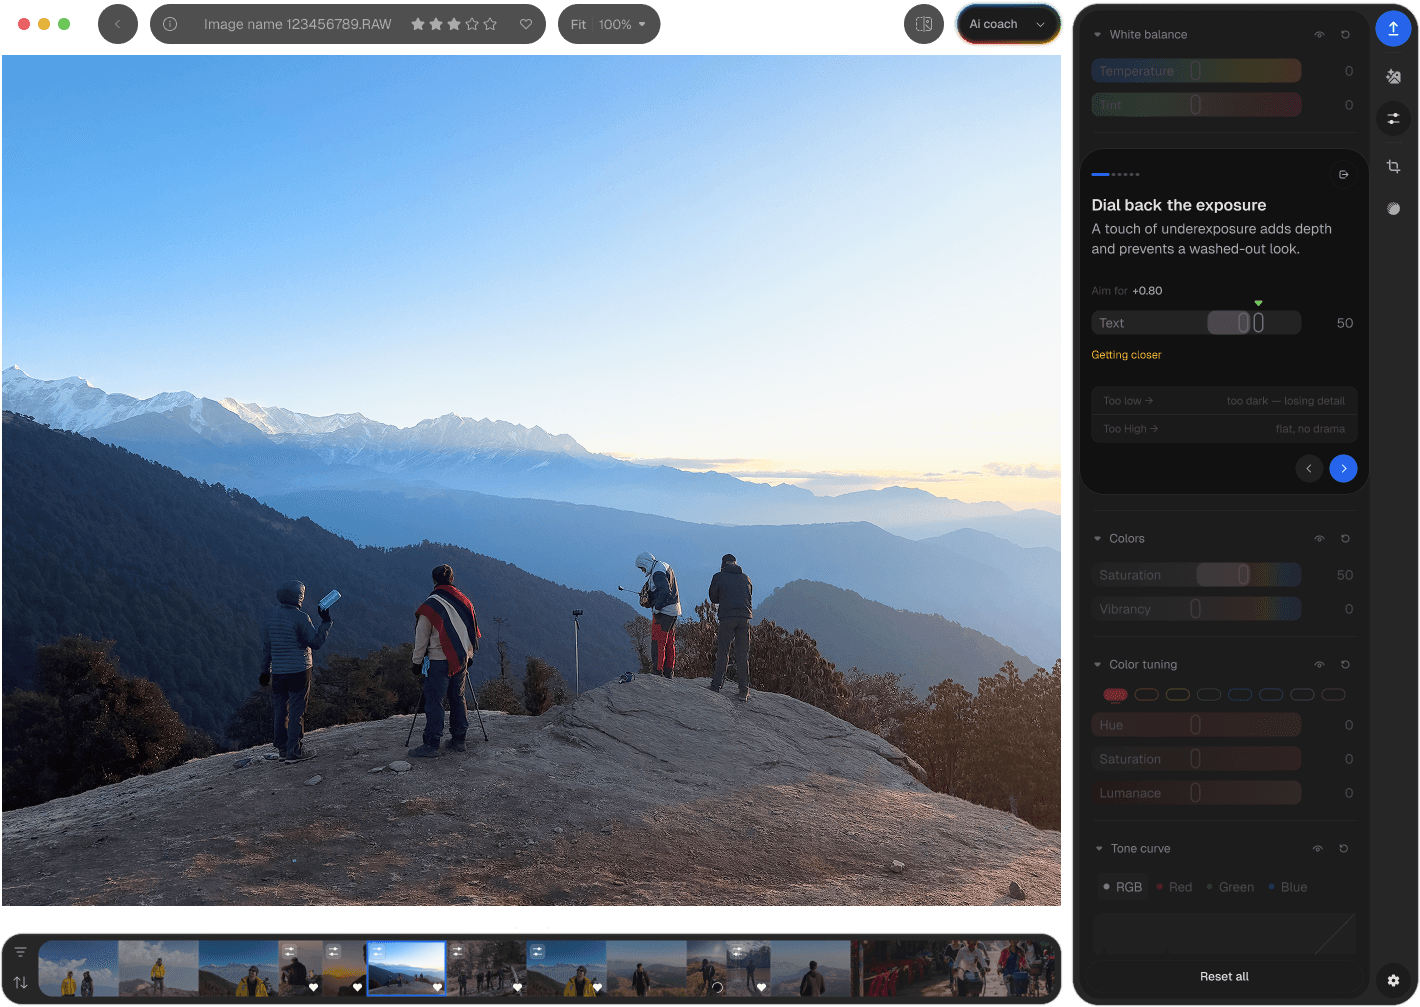
That's also where newer editing tools can genuinely help.
Instead of simply applying one-click edits, Photon explains why an adjustment improves an image. Understanding why highlights are distracting or why a different white balance creates a more natural look helps build editing instincts that carry into your next shoot.
5 Beginner Street Photography Exercises
Reading about street photography will only take you so far.
The real learning begins when you head outside with a camera and give yourself a simple objective. Limiting what you're looking for often makes it easier to notice photographs you would otherwise miss.
Here are five exercises that will sharpen your eye without requiring special equipment or a dramatic location.
1. Stay at One Intersection for 30 Minutes
Instead of wandering through the city, choose a single street corner and don't move.
At first, it will feel like nothing is happening.
Then you'll begin noticing patterns. The way people avoid puddles. The rhythm of traffic lights. The moments when sunlight reaches the pavement. You'll realise that the scene keeps changing even though you're standing still.
The exercise teaches patience and anticipation, two of the most valuable skills in street photography.
2. The One Colour Challenge
Choose a single colour before you leave home.
Spend the next thirty minutes photographing only scenes where that colour becomes an important part of the composition.
The goal is to notice how the color interacts with people, light and the environment.
3. Photograph Only Hands
Faces naturally draw our attention. Hands often tell a richer story like a baker kneading dough, someone gripping a train handle, friends gesturing during a conversation, or a musician tuning an instrument.
By removing faces from the equation, you'll begin noticing gestures and details that usually go overlooked.
4. Follow the Shadows
Head out during early morning or late afternoon when shadows are long. Instead of looking for people first, look for interesting shadows created by buildings, trees or street furniture. Once you've found them, wait for someone to enter the frame.
This exercise trains you to recognise light before subjects.
5. Photograph Your Morning Commute
You don’t need to travel somewhere interesting to make good street photographs.
Simply spend a week photographing the same commute instead. Photograph the same station, the same café, the same crossing.
You'll discover that familiar places become surprisingly rich once you begin paying closer attention.
Your First Street Photography Session
Your first street photography session doesn't need to end with a portfolio-worthy image. It's better if that's not your expectation.
Treat it as an opportunity to practise noticing rather than producing. Every outing teaches you something, even if you come home without a single photograph you'd want to share. You might discover that you're more comfortable photographing from across the street than standing close to people. You might realise that you consistently notice good light but struggle with timing. Those observations are progress.
A simple routine can help take some of the pressure off.
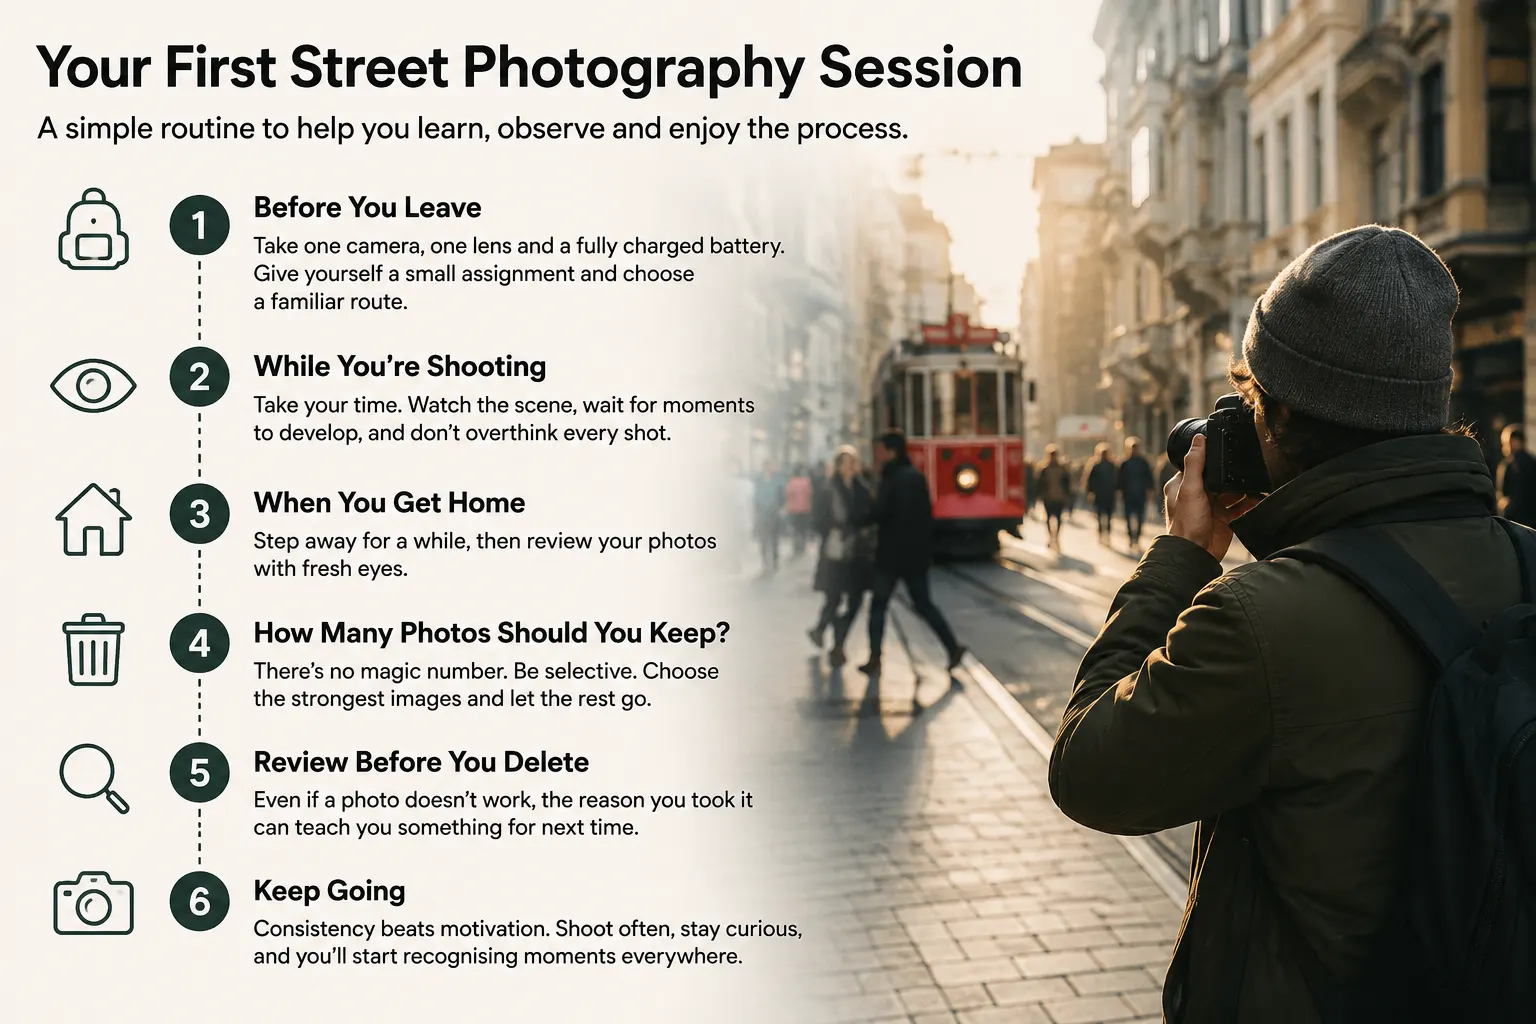
1. Before You Leave
You don't need to spend half an hour packing. Take one camera, one lens and a fully charged battery. If you have a spare battery and memory card, throw those into your bag and leave everything else behind.
Before stepping outside, give yourself one small assignment. Maybe today you're only going to photograph reflections, or you're looking for interesting light. Or you're paying attention to people waiting.
Having a theme narrows your focus. Instead of trying to photograph everything, you'll start noticing the things you've decided matter.
Just as importantly, choose a route you're already familiar with. Your neighbourhood, your local market or the streets around your office are often better places to learn than somewhere you've never visited before.
When you're not worrying about directions, you have more attention to give to what's happening around you.
2. While You're Shooting
Resist the urge to rush. If something catches your attention, spend a few seconds watching the scene first.
Ask yourself:
What's interesting here?
Is something about to happen?
Would waiting improve the photograph?
You'll often find that the best frame arrives a few moments after you first noticed the scene.
At the same time, don't overanalyse every shot. If something genuinely interests you, make the photograph. You can always decide later whether it works.
3. When You Get Home
When you come back home, leave your camera for a while if you can. Come back later with fresh eyes.
You'll notice things you missed immediately after the shoot.
Distance makes editing easier because you're no longer emotionally attached to every photograph you took.
4. How Many Photos Should You Keep?
Honestly? There isn't a magic number. I know photographers who return from an afternoon with three photographs worth keeping. I also have photographer friends who return with hundreds.
As a starting point, I’d say, be selective. If you photographed one moment twenty times, choose the strongest version and let the rest go.
Learning to edit your own work is every bit as important as learning to use the camera.
5. Review Before You Delete
Sometimes a photograph doesn't work, but the reason you stopped is still valuable. You might realise that the composition needed simplifying. Or that waiting two more seconds would have brought another person into the frame.
Those lessons shape the next outing far more than simply deleting the image and moving on.
6. Keep Going
Street photography rewards consistency far more than occasional bursts of motivation. You don't need to spend eight hours wandering through a city every weekend. Even thirty minutes after work once or twice a week is enough to make noticeable progress.
The more often you carry a camera, the less you'll think about camera settings and the more you'll notice the world around you.
Eventually, you’ll stop looking for photographs. You’ll start recognising them.
The Bottom Line
Success in street photography has very little to do with how many people compliment your work or how many photographs you post online. It begins much earlier than that.
Your camera is simply a tool. What matters is learning to notice the small moments that everyone else walks past: the changing light at the end of the street, the rhythm of commuters crossing an intersection, the conversation happening outside a corner shop, the reflection in a rain-soaked window.
Those moments have always been there. Street photography teaches you to see them.
Like any skill, your eye will improve with practice. Some days you'll come home with photographs you're proud of. Other days you'll come home with nothing worth keeping.
But both days count. The more you keep observing and photographing, the images will follow.
FAQs about Street Photography
1. Is street photography legal?
In many countries, yes. Photographing people in public spaces is generally legal, but the rules vary depending on where you live and how the photographs are used. Before photographing in a new city or country, it's worth taking a few minutes to understand the local laws. Even when something is legal, it's always worth asking whether it's respectful.
2. Can I use my phone for street photography?
Absolutely. A dedicated camera gives you more control, particularly in low light, but a smartphone is more than capable of teaching you the fundamentals of observation, timing and composition. Some of the best street photographers will tell you that the camera matters far less than the person holding it.
3. Should beginners shoot RAW?
If your camera or phone supports it, yes.
RAW files preserve far more information than JPEGs, giving you greater flexibility when you edit exposure, colour and white balance later. They may look flatter straight out of the camera, but that's because they haven't been processed yet.
If you're only sharing quick snapshots, JPEG is perfectly fine. If you're trying to improve as a photographer, RAW is well worth learning.
4. What's the best focal length for street photography?
There isn't a single correct answer, but 35mm is often recommended because it offers a natural balance between your subject and the surrounding environment.
If you prefer tighter, more intimate compositions, 50mm is another excellent option.
5. Should I ask people for permission before taking their photo?
It depends on the situation. If someone is simply part of a wider public scene, candid photography is common in street photography. If an individual is clearly the main subject of the photograph, especially at close range, asking for permission may be the more respectful approach. Good judgement matters more than following a rigid rule.
6. How many photos should I take during a street photography session?
There's no target number. Some photographers make hundreds of exposures during a walk, while others come home with only a few dozen. Rather than focusing on quantity, concentrate on being intentional. It's better to return with five thoughtful photographs than fifty taken without much consideration.
Made for photographers learning in public.